


Hi! So you want to make some custom banners or siggies? Well I’ll tell you how!
We can’t all buy fancy programs like Photoshop, but there is a free one out there called GIMP. It is “open source” meaning that anyone can use it for free, and the development is funded 100% by donations. These tutorials will be designed around the GIMP program, but if you have another program, such as Photoshop or Illustrator, they will probably have the same tools and functions (but maybe under different names.)
Ready? Let’s get started!

Tutorial 1: Making a new file
Alright, so you’ve downloaded and installed GIMP, right? If not, do that now.
You’ll notice that there is now an icon on your desktop.* Double click to open the program.
*If you have Windows 8, the icon will show up in your Start Screen.
GIMP loads as three boxes.* On the left is your Toolbox. This has all the tools you will use. In the middle is the window with the picture itself. On the right, there are several menus for things like layers and paths.
*Don’t like the multi-window setup? Try “Single Window Mode” which is in the Windows drop-down menu on the top bar.
The first thing we should do is create a new file. So click on the File menu, and then click “New.” A window will pop up:
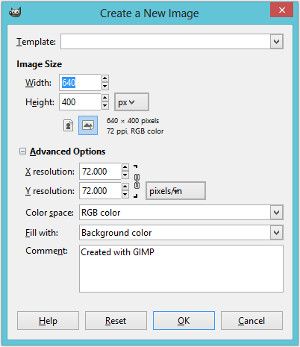
You can change the size based on what you want to do. For the purpose of this tutorial, let’s make a banner.
1. In Advanced Options, change the resolution* to 300 pixels/inch.
*Resolution changes how detailed you can make the picture. More pixels = cleaner detail. However, it also makes the file size bigger.
2. Set the Width to 2 inches, and the Height to 1 inch.
3. Click OK.
You now have a blank canvas. Yes, it’s a little too big to go in a signature right now, but it’s easier to work on when it’s big, and you can shrink it later when you’ve finished.
Before we do any work, we need to make sure we save the file in case anything happens.
1. Click File, then click Save.
2. In the left menu, click Documents.
3. Name the file “banner” and click Save.
You can now draw whatever you want! [Don’t worry, the tutorial on how to actually draw comes later.]
Tutorial 2: Basic Tools
You have a canvas now. But what can you do from here? Let’s go through the basic tools.
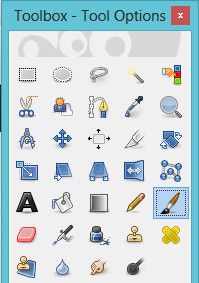
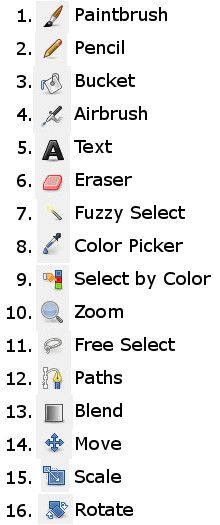
This is your toolbox. It contains the tools that you will use the most. To select a tool, simply click the icon. The tools you will use the most are in the list below.
At the bottom of your Tool Box is your Tool Options. These are adjustments that can be made to the specific tool. The available options change depending on the tool – for example the Paintbrush, Pencil, Airbrush, and Eraser all share the same brush options, while the Text tool lets you choose font and font sizes. Feel free to experiment with these tools – click on it, draw around, make adjustments in the Tool Options and see what happens!
We still have our banner open, right?
1. Select the Paintbrush tool. Draw a line.
2. Now change the brush Size – you can do this by clicking near the top of the Brush Size bar, or by clicking in the middle of the bar and dragging. You can also delete the actual size value and type in your own, or click the arrows on the right end.
3. Experiment with the aspect ratio, angle, and opacity of the brush as well.
4. See the Brush option above the Size bar? Click the fuzzy black circle. These are the different “types” of brushes you can use. Play around with the different brushes.
The standard shortcuts still work in GIMP:
CTRL + Z = Undo
CTRL + C = Copy
CTRL + V = Paste
CTRL + X = Cut
Then there are a few others:
When you have something selected with the Fuzzy Select or Free Select tools, CTRL + SHIFT + A will deselect everything. To add to the selection instead, hold down SHIFT and click outside your current selection. Or hold down ALT and click to subtract from the selection. There are lots of keyboard shortcuts, and you find them on the button and menu options. For example…
1. Put your mouse over the Blend tool in your Tool Box.
2. Read the short description. Notice on the end, the letter L is in bold.
3. Move your mouse away. Press L on your keyboard.
4. Click and hold your mouse. Drag it a couple inches, and release.
Now, what about colors? I mean, I figure you don’t want everything in black and white.
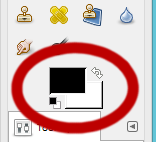
Here is where you pick colors. The one on top is the “foreground color” and the one underneath is the “background color.” This is most useful when you use the Blend tool, as these are the two colors you choose that will blend into each other. The double arrow will switch the colors, and the miniature B&W boxes will revert your color selections back to default black and white.
Tutorial 3: Layers
The Layer function is one of the best things about programs like GIMP and Photoshop. You can draw different things on different layers, and don’t have to worry about messing them up. Bonus: if you decide you want to move something, just move the layer!
So, you still have that file open from Tutorials 1 and 2, right? If not, go ahead and create a new file – any size you want.
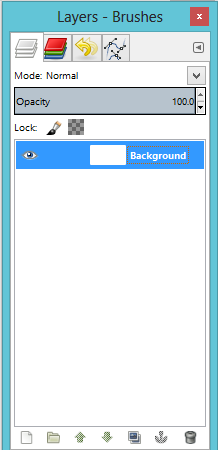
Here’s your Layers menu, on the right side of your screen. You can see that you automatically have one layer, named Background, in the list. If you click the eyeball, it turns the visibility of the layer on and off. So, if you need to work on a background layer, just turn off the layers in front of it!
1. Click the bottom-left icon (the sheet of paper) to create a new layer. (shortcut: SHIFT + CTRL + N)
2. Name the layer “Head” and set the Layer Fill Type to Transparency. Click OK.
3. In the Layer Menu, click the Head layer. Select the Paintbrush tool, and doodle a head with a smiley face.
4. Click the eyeball on the Head layer to turn it off. Click the button again to turn it on.
5. Click the New Layer button and name it “Hair.” Click OK. Select Hair layer in the Layers menu.
6. Change your brush color to something new (red, green, anything). Draw some hair on the head.
7. Click and drag the layer named Head to the top of the Layers menu. Notice how the lines of the Head come in front of the lines for the Hair. Click and drag the Head layer below the Hair layer.
You now have the basics for making pictures in GIMP. Don’t be afraid to play around and try new things! More tutorials will follow soon.
_ _ _ _ _ _ _ _ _ _ _ _ _ _ _ _ _ _ _ _ _ _ _ _ _ _ _ _ _ _ _ _ _ _ _ _ _ _ _ _ _ _ _ _ _ _ _
Subsequent tutorials:
Tutorial 4: An In-Depth Discussion of the Tools
Tutorial 5: Making a Banner for your Signature
Tutorial 6: Make a picture from scratch
Edited by tbiM20, 05 November 2013 - 09:24 AM.


 I was totally clueless on how to use GIMP, this is an amazing tutorial!
  Thank you so much for taking your time to do this, I know this will be helpful to so many! <3
 It's a really useful program (and so awesome that it's free!!!)


 Thank you so much for doing all of this!