Jump to content


Photo

Tutorials - Using GIMP


  • Please log in to reply
39 replies to this topic

#16 tbiM20

tbiM20

    Ultimate Hamster Clone

  • Off-Duty Crew
  • 2,576 posts
  • Gender:
  • Location:West Virginia

  • My Syrian(s):1
  • My Dwarf(s):0

  • Zodiac:
  • Country:

  • Mood:

Posted 24 October 2013 - 06:02 AM

valentine.gif  Thank you for making this tutorial!! Best Gimp Tutorial I have seen. Really helped me! I couldn't figure out layering. But then it to me forever to learn saving! But I eventually figured it out.


You're very welcome! I will be making another tutorial soon, keep tuned :)


Can you add photos to you're banner using Gimp? i really want to know how to make banners with pictures, but i am clueless. i don't even know how to put photos into the the pretty templates hopping hammy posted :(


Absolutely! You right click on HH's banner and click "Save image as..." Once it's saved, you open the file in GIMP and copy-paste your photo in there. Resize the photo using the Scale tool, and then put the photo layer behind the banner layer.


#17 DwarfCrazy

DwarfCrazy

    Veteran Hamster

  • Members
  • 551 posts
  • Gender:

  • My Syrian(s):0
  • My Dwarf(s):0

  • Zodiac:
  • Country:

  • Mood:

Posted 24 October 2013 - 09:40 AM

When i tried to save the template to gimp it said the file was "read only"... was i supposed to save it to gimp or was i supposed to save it to something else? I'm sorry, I'm really bad with computers!


#18 tbiM20

tbiM20

    Ultimate Hamster Clone

  • Off-Duty Crew
  • 2,576 posts
  • Gender:
  • Location:West Virginia

  • My Syrian(s):1
  • My Dwarf(s):0

  • Zodiac:
  • Country:

  • Mood:

Posted 25 October 2013 - 12:29 AM

When i tried to save the template to gimp it said the file was "read only"... was i supposed to save it to gimp or was i supposed to save it to something else? I'm sorry, I'm really bad with computers!


It's okay, it's a little weird. smiley.gif You have to save it to your hard drive first, then open it in GIMP, to preserve the transparencies in the file.


Tutorial 5: Making a banner for your signature


Now it's time to make a siggy! IKR? We're going to use some banners here on the HH site, so we know that the images will work properly. Later, you can use your own files right off of your computer.


1. Go to the Free for All! templates thread. Browse through the available images for frames and select one of the Stars templates.

2. Right-click on the template image, and click "save image as..."

3. On the left of the popup window, select the Desktop. Save the image with the name "Tutorial_5" and click OK.
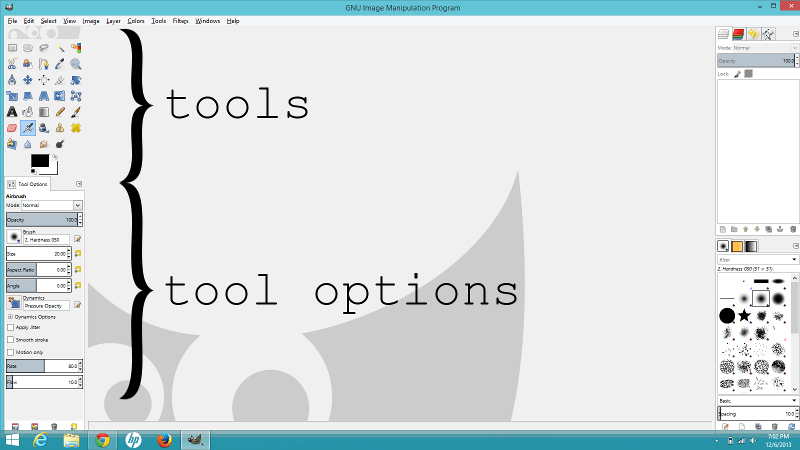
4. Open GIMP.

5. Click File > Open, select the Desktop folder and then open the "Tutorial_5.png" file.


Your template is now open in one file. But we need pictures! My boys Ray, Winston, and Deebee have been so kind as to volunteer for a little photo shoot, so just right-click and download their images onto your desktop as well. Follow steps 1-5 above for each image, but skip step 4 since GIMP is already open.

e1f3c9c9-2ea7-40a4-9cd3-38e1b3a7ac44_zps56674c6b-56a0-4bf0-855e-8a1b2e855ac4_zps2322acd0-82f3-47e7-bb3a-f2a851794be4_zps


Now, time to add the pictures into the template.


1. Select one of the photo files. Click on the layer of the photo, on the right in the Layers menu. Press the keys CTRL and C.

2. Go to the template file. Click CTRL and V.

3. Look on the right, in the Layers menu there is now a "floating" layer. Just click the New Layer button (the one on the bottom-left of the Layers menu) and it will "solidify" to a new layer.

4. In the layers menu, drag the photo layer below the template layer.

5. I can guarantee the photo is too big to fit into the little star window, so we need to resize it. Select the photo's layer, select the Scale tool, then click on the image.

6. Before you do anything look at the window that popped up. Between the Height and Width there's a little button that looks like a broken chain. Click it once to lock the aspect ratio (so it stays the same proportions and it doesn't stretch.)

7. Now look back at the image, and just click on the boxes in the corners and drag them around to change the size of the photo. Once you have it to the size you want, click "Scale" in the popup window.

8. Repeat steps 1 through 7 for each of the other two images.

9. Arrange the images in the star frames as you like.


Now, you'll notice that outside of the stars is empty, just like the insides so that we can frame a picture. Why? Well, if the background of the webpage is white, and the outside of the stars is white, no biggie. But if the webpage is, say, blue, then we now have a white box in our signature, when we just wanted the star frames! But, it's made a bit of a problem for us, since you can now see the photos outside of the frames. So let's erase it!


Using the Eraser tool

1. Select the layer for the right-most photo.

2. Select the Eraser tool. Change the Brush to the solid-edged circle (Hardness 100) and change the size to 20.

3. Click and hold the eraser tool and erase all of the photo on the outside of the first star. Notice that you cannot erase the star itself, or the other photos, because they are not on that layer.


Using the Free Select tool

1. Select the middle photo.

2. Select the Free Select tool (shortcut F on the keyboard).

3. There are two ways to use this tool. The first way, you click and hold while tracing a shape around the thing you want to erase. So you can trace carefully along one side of the star, then circle around that part of the photo you want deleted. Release the mouse button when you get back to the start, and click on the circle that has popped up to complete the selection. Press the Delete key.

4. The second way is to use anchor points. Simply click on a point on the star, then click on the next angle, then the next point, then click a couple times to make a box around the part of the photo you want to delete. Click on the beginning anchor point to complete the selection, then press the Delete key.


Using the Fuzzy Select tool

1. This time, select the template layer.

2. Select the Fuzzy Select tool (shortcut U)

3. Click on the empty space outside of the stars. Notice how it selects close to the yellow border around the stars? Hold the Shift key and click on the yellow border to add that to the selection.

4. Now select the layer for the left-most photo. Press the Delete key.

5. To deselect, hold the Ctrl button and press the A key.


Almost done! We now need to finish the file up and post it online.


1. Right click on the template layer. At the bottom of the menu, click "Merge Visible Layers." Select "Clipped as necessary" and then click Merge.

** We don't want to "flatten" the image because it will automatically create a solid white background when we want to keep the transparency.

2. Go to File > Export, and click Export, then Export again. Done!


Follow this tutorial with the banner of your choice and your own photos, then upload it to your preferred image hosting site and show it off here! ;D


Banner_zpsdd15baad.png


Edited by tbiM20, 05 November 2013 - 07:04 AM.

  • HoppingHammy and Hammy's Papa like this

#19 DwarfCrazy

DwarfCrazy

    Veteran Hamster

  • Members
  • 551 posts
  • Gender:

  • My Syrian(s):0
  • My Dwarf(s):0

  • Zodiac:
  • Country:

  • Mood:

Posted 25 October 2013 - 08:20 PM

Ok, thanks so much! I'm going to try it again when I'm at home, because I'm out of town for the day.

Edited by Dwarflove99, 25 October 2013 - 08:21 PM.


#20 theta

theta

    Hamster Clone

  • Members
  • 1,505 posts
  • Gender:
  • Location:sk

  • My Syrian(s):0
  • My Dwarf(s):0

  • Zodiac:
  • Country:

  • Mood:

Posted 29 October 2013 - 02:24 AM

(Hey back again hah) So I'm making something (this isn't the finished piece but it's just to give an idea of what I'm making) 

vdgxet.jpg


What I want to put, is three gifs (but blended together, but not like this - tumblr_inline_mlqess5u9m1qz4rgp.gif like one after the other but fade into each other? Does that make sense? Sorry I'm horrible at this! XD) in the middle where John is sitting... but like not taking over that whole space more like off to the side as if he's thinking about it? Can you picture that? Does that make sense? (Also if pixlr lowers the quality of it all, which it probably will, how do I change the 'filter' so it looks like more vintage/orange/pink/purple/whatever color I choose?) 

So 1.) How do I make the gif so that three gifs becomes just one big gif? (Does that make sense??? XD I'm so sorry) 

2.) How would I put it onto the background? Do I just add layer behind that and erase like I did to get the middle? Would it show up as a gif in the final piece though?
3.) Why won't any of my gifs actually save AS gifs? Like I'll open them up and it's just a still picture, not moving...?
(I think I had another question but I have music on so I'm distracted and more confused and unfocused than usual XD)


#21 tbiM20

tbiM20

    Ultimate Hamster Clone

  • Off-Duty Crew
  • 2,576 posts
  • Gender:
  • Location:West Virginia

  • My Syrian(s):1
  • My Dwarf(s):0

  • Zodiac:
  • Country:

  • Mood:

Posted 29 October 2013 - 03:53 AM

1.) How do I make the gif so that three gifs becomes just one big gif? (Does that make sense??? XD I'm so sorry) 

2.) How would I put it onto the background? Do I just add layer behind that and erase like I did to get the middle? Would it show up as a gif in the final piece though?

3.) Why won't any of my gifs actually save AS gifs? Like I'll open them up and it's just a still picture, not moving...?

(I think I had another question but I have music on so I'm distracted and more confused and unfocused than usual XD)


I'll have to look around, honestly I haven't ever made an animated gif! But to answer your third question, GIF is just a compression, that happens to be able to preserve animation, but being a gif doesn't make it animated. I think you can go into the Filter options in GIMP and at the bottom there is an animation option... no clue where it goes from there!


I believe the way it works is that each layer is a separate "slide" in the sequence on the file. So to create the fade, you have to create a sequence of images. Remember doodling stick people on a sticky note pad and flipping through it to make them move? I think that's how it works. If that's the case, then for the background you have to add it to each layer.


I might be totally making all that up ^_^ but that's the gist I got when I opened an animated gif in GIMP once.


#22 tbiM20

tbiM20

    Ultimate Hamster Clone

  • Off-Duty Crew
  • 2,576 posts
  • Gender:
  • Location:West Virginia

  • My Syrian(s):1
  • My Dwarf(s):0

  • Zodiac:
  • Country:

  • Mood:

Posted 05 November 2013 - 09:23 AM

Tutorial 6: Make a picture from scratch


Okay, obviously we're not going to create photo quality detail here. This is a basic tutorial to get you familiar with some of the tools, but it's going to be the first real big project! We're going to make an artistic banner of sorts and I want you to post your final image on here! grin.gif It'll be fun and creative. Ready? hyper.gif


1. Open Gimp. Go to File > New and create an image that is 150 pixels/inch resolution and is 3 inches wide, 1 inch in height. (Remember how to do that from Tutorial 1?)

2. Let's make a pretty background. First select the Bucket Fill tool, choose a Foreground color, and then fill the background with the color of your choice. Then use the Airbrush and Paintbrush tools, with different colors, sizes, and brush heads, and draw some squiggles, spots, and abstract lines for a colorful background.

3. Let's make some stars! Select the Paths tool. Click the 10 points to make a star. When you get back to the beginning, hold the Shift key and click the first anchor point. If you think your star is a little lopsided, just click and hold on the anchor points and move them around.

4. In Tool Options, select Stroke Path. Keep the default settings and click Stroke. It will follow the path you created, like using a ruler to guide a pen.

5. Let's fill in the star. In Tool Options, now select "Selection from Path." Click the Paintbrush tool, change the color to something you like (or keep it the same as the outline), increase the brush size if you need to, and fill in the star.

6. Now let's make a heart! Use the Paths tool again. Click once for the bottom point of the heart. Directly above it, click again but hold down the mouse button and drag the button over. See how some little arms appear? First hold the Shift key and click on the first anchor point to complete the shape. Now click on the top anchor point again, and move the "arms" around to change the angles. Hint: make them create a "v" to get the heart shape.

7. Choose Selection from Path and fill in the heart.

8. Create some unique shapes using the Paths tool some more.


Having fun yet? Now let's play with some other tools!


1. Select the Text tool. Choose font Sans Bold Italic, size 60, and justified Centered. Change to foreground color to something new. Click and hold to create a text box, and type your username. If it's bigger than the image, you can reduce the font size.

2. Use the Move tool and put your username where you want.

3. Let's outline your name! Right-click on the text layer, and select Text to Path.

4. Choose a new Foreground color, and a contrasting Background color. Select Paintbrush, the smallest fuzzy circle brush (Hardness 025) and size 5. Also in the Tool Options, change the Dynamics to Random Color.

5. Next to the Layers Menu tab, click on the Paths tab. The top path will be the one that outlines your text, so make that one visible (the same way you make a layer visible, as mentioned in Tutorial 1.)

6. Select the Path tool. Place your cursor over the visible path, until it turns into a hand. Click once to select the path.

7. Click Stroke Path. Select "Stroke with a paint tool" and select Paintbrush in the drop-down menu. Click Stroke.

8. Select any other tool in the Tools Menu. In the Paths menu, click the eye on the visible path to hide it.


Hmm, I think I want to change the name up a bit!


1. Select the Select By Color tool. Click the middle of one of the letters, and it will select that color in all of the letters.

2. Use the Color Picker to select the color in the middle of the letters as the Foreground color. Change the Background color to white or black.

3. Select the Gradient tool. Change the Shape and Repeat as you like (I chose Radial and Triangular wave.) Click your mouse, drag it a little ways, and release the button. Remember, you can change the Tool Options and reapply the gradient as many times as you need to get something you like.

4. Click Ctrl + A to deselect.

5. Find the Perspective tool (shortcut Shift + P). Click on the picture to select. Drag the corners around until you like it, then click the Transform button.

6. If you want to make it bigger, use the Scale tool like in previous tutorials.


Okay, let's finish up!


1. Open the Image menu at the top, select Flatten Image.

2. Go to File > Export and save the image as a .jpg or a .png (you choose these in the File Extensions dropdown.)

3. Save, upload to your photo sharing site, and post your image on here!


Untitled_zpsea487e1c.png


Edited by tbiM20, 05 November 2013 - 09:25 AM.

  • HoppingHammy, Creative Hamster, Pokeyyy and 1 other like this

#23 Pokeyyy

Pokeyyy

    Hamster Clone

  • Members
  • 1,102 posts
  • Gender:

  • My Syrian(s):0
  • My Dwarf(s):2

  • Zodiac:
  • Country:

  • Mood:

Posted 09 November 2013 - 08:43 AM

this is all very very helpful :)


#24 Fuyu&Jinger15

Fuyu&Jinger15

    Hamster Clone

  • Members
  • 1,485 posts
  • Gender:

  • My Syrian(s):0
  • My Dwarf(s):2

  • Zodiac:
  • Country:

  • Mood:

Posted 03 December 2013 - 07:55 AM

Very in-depth and informative! Great tutorial!!! I know this will help a lot of the less tech-savvy people on the forum. :valentine:


#25 Lon

Lon

    Action Hero Ham

  • Members
  • 5,247 posts
  • Gender:

  • My Syrian(s):0
  • My Dwarf(s):0

  • Zodiac:
  • Country:

  • Mood:

Posted 07 December 2013 - 02:30 AM


At the bottom of your Tool Box is your Tool Options. 

I can't find the tool options! I'm so lost!


#26 tbiM20

tbiM20

    Ultimate Hamster Clone

  • Off-Duty Crew
  • 2,576 posts
  • Gender:
  • Location:West Virginia

  • My Syrian(s):1
  • My Dwarf(s):0

  • Zodiac:
  • Country:

  • Mood:

Posted 07 December 2013 - 08:09 AM

I can't find the tool options! I'm so lost!


Maybe this will help:


gimptools_zps555bd116.png


Remember what's actually in the tool options will change depending on which tool you have selected. :)


#27 Lon

Lon

    Action Hero Ham

  • Members
  • 5,247 posts
  • Gender:

  • My Syrian(s):0
  • My Dwarf(s):0

  • Zodiac:
  • Country:

  • Mood:

Posted 07 December 2013 - 08:10 AM

I know the tool options is actually gone and I used to have them but now they are gone in the tool box area it says "Place Dockable Dialogs here"


Maybe this will help:


gimptools_zps555bd116.png


Remember what's actually in the tool options will change depending on which tool you have selected. :)


#28 tbiM20

tbiM20

    Ultimate Hamster Clone

  • Off-Duty Crew
  • 2,576 posts
  • Gender:
  • Location:West Virginia

  • My Syrian(s):1
  • My Dwarf(s):0

  • Zodiac:
  • Country:

  • Mood:

Posted 07 December 2013 - 11:44 AM

I know the tool options is actually gone and I used to have them but now they are gone in the tool box area it says "Place Dockable Dialogs here"


Oh! K I've done that accidentally before.


At the top, click Windows > Dockable Dialogs > Tool Options


The tool options will show up as a floating window. Click the Tool Options tab within the window, drag it over to the space where it's supposed to be and release. It should just pop in there.


#29 Lon

Lon

    Action Hero Ham

  • Members
  • 5,247 posts
  • Gender:

  • My Syrian(s):0
  • My Dwarf(s):0

  • Zodiac:
  • Country:

  • Mood:

Posted 07 December 2013 - 11:45 AM

yay! thank you SO much!


#30 tbiM20

tbiM20

    Ultimate Hamster Clone

  • Off-Duty Crew
  • 2,576 posts
  • Gender:
  • Location:West Virginia

  • My Syrian(s):1
  • My Dwarf(s):0

  • Zodiac:
  • Country:

  • Mood:

Posted 07 December 2013 - 11:51 AM

yay! thank you SO much!


Welcome! ;D Glad it's fixed.