


Tips On Photographing Your Hamster
(or any other subject)
After a few years of practicing and learning, I've been able to pick up some tips & techniques on how to get better photos and would like to pass those on to you. I do not claim to be a professional, nor do I follow the rules 100% of the time. We also must understand that different cameras will give different results and a lot of it *does* depend on a good camera - I’m not going to lie to you - but many of these tips are things anyone can do to improve their photos, no matter what their skill level or equipment happens to be.
There is a vast amount of material that we could cover and go over, but in order to prevent confusion or avoid overwhelming anyone, this article is going to be kept as simple and basic as possible. If you are at a more advanced level and have questions or wish to talk further, please leave your comments below and I will do my very best to answer them or provide additional help. 
Ready? Here we go!
==========================
Tip #1: Let there be light!
Light is the most important aspect of taking good pictures. Without it, a normally beautiful subject can look flat, boring, grainy, and unflattering. Another good reason you need light is to prevent that dreaded camera blur - especially with fast animals such as hamsters. So, before you even think about clicking that shutter to take a photo, you want to have access to as much light as you can possibly find. This might include:
Tungsten light (Regular household lamps, desk lights, or overhead lights. This light type produces an orange tint.)
Fluorescent light (Found in some kitchens and studio light kits. This light type varies slightly, from bulb to bulb, but typically produces a greenish or bluish tint and gives better results then tungsten does.)
Window or daylight (Pretty self-explanatory! This is usually the most flattering, natural light you can use - provided you aren't in direct sunlight which is too harsh. Typically the camera does a fine job adjusting for this type of light, but varying weather will give different results. A sunny day gives a warmer temperature then an overcast day, which would have a cooler tint. Don't worry about the tint right now, so much as the amount of light and it's intensity.)
Flash (This can be either on-board flash or an added, external unit. If used properly, it can give great results with the most control and is available for use at any time of day. When it comes to photographing animals, you do want to use caution whenever popping a flash. More details on this subject further down the page. There will also be a bonus DIY diffuser for those of you with SLR cameras.)


==========================
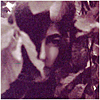
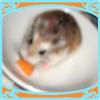
Now that we've covered the most common light types you might use, I will now show you some examples of the different results you might get from each one. For these examples, I will be using an (almost) life-size, plush hamster who has been trained to sit still at all times. Let's call him "Squiggles." If you get bored easily, you might be tempted to skip this part, but I feel it's very important to show a visual reference of the different results you can achieve with lights and color temperature.
EXAMPLES:
1.
In this photo, I want you to notice the general lack of light and how Squiggle's eyes are practically non-existent as they fall into the shadows. This is how many people take photos because our eyes see a much wider range of light and color then our camera sees. Also, do you see how tungsten light creates that awful, orangey tint? Yes, it *could* be fixed in Photoshop if you know how to use it properly, but let's try and improve our photo first, before relying on Photoshop.
2.
Now we've added one desk light, off to the side. Does it add more light?....not much. Does it look horrible still?....yes! Notice the harsh shadows that are distracting and take away from the main subjects you are trying to show. Also, the orange tint just got worse.
3.
Ok, now we're starting to bring more light in and it's looking better in terms of softening those shadows. At this point, this set up *could* work if it's all you have, but you want to do one thing - that would be to change your camera's white balance setting to "Tungsten". What this does is to neutralize the orange. Just don't forget to change it back once your photo shoot is over with! Another option would be to fix it in Photoshop, as mentioned earlier. In fact, there will be a basic tutorial included at the end of this post, showing how to color correct in one click.
4.
Now we're moving on to a different light type - fluorescent. There is one light only and as you can see, the nasty orange coloring has gone away! It looks much better already, but......there is a lot we can improve on. The shadows are very harsh, once again, and we need to bring light back into Squiggle's eyes. This is where a 2nd light or a reflector comes in handy. Fluorescent lights, in general, tend to be brighter and higher wattage then the tungsten ones do, by the way.
5.
Ok, NOW we are finally getting somewhere and seeing good results, wouldn't you agree? Technically, the shadows could be filled in more if the fill light (on the right side) was brought in closer, but this is just a rough example and is not showing a perfectly tweaked set up. The white balance is pretty spot on and wouldn't need much adjusting, if any. This is the setup I most use for my own hamster photos - the reason being because it is a constant, steady light as opposed to using flash. With small animals, you do want to be careful about popping a bright flash too often or in too close of a range, as it could cause serious problems; perhaps even blindness or seizures.
6.
YUCK! We're back to horrible photos again. Most every camera has an on-board flash. This is the one that tends to fire automatically if it is dark in the room, and it gives rather ghastly results that are unflattering, if I do say so myself! I highly recommend you don't ever use this silly thing, because 90% of the time it will result in amateurish photos.
7.
Another example of the same. Sometimes the flash will blow out your subject completely or create those harsh, rim shadows that you see in this photo.
8.
Do you see the difference in this photo compared to the previous one? The shadows are softer, the highlights are more natural, and over all you can't even tell that a flash was used because it is spread over a larger area. This is a technique for advanced photographers who have the capabilities to use an external flash with their camera. An external flash looks like the middle photo posted up above, under the "Flash" section. Some of the top level, compact cameras have a hot shoe mount for small units, so read up on it and see if yours has the capability.
9.
To improve the last photo and take it even one step further, the on camera flash was popped up and set to a very low power setting. This allows it to be used as a fill flash rather then a main flash, and it adds a bit of sparkle to the hamster's eye. As before, the external flash unit was bounced on the ceiling. If you don't have a way to bounce your flash, you can try taping a thin piece of paper or tissue over your camera's flash to try and diffuse it a bit. I can't guarantee good results, but you might have success on occasion.
I do not have an example of daylight or window light, since we all know what that looks like and it does vary greatly from location to location. Reflectors, mirrors, silver car windshield protectors, or even a simple piece of white foam board can serve well to bounce light into shadows. Trial and error is the best way to learn. Lastly, avoid mixing various types of lights. As you've learned, different lights have different color balances. If you have a tungsten light on one side and a window on the other, your photo will be half orange-y and half bluish; not very pretty!
Tip #2: Watch your background.
It's easy to get carried away and so focused on our subject (and how cute they are!) that we completely neglect the background. How many times have you seen photos of an adorable toddler.......with random people walking in the background, or a plant "growing" out of someone's head? The same goes for hamster photos. Try to clear out some of those toys in their cage or books on your coffee table. You want your viewer to spot your subject, not the half-empty glass of juice in the background!
==========================
- DON'T clutter your photo with unnecessary items.
- DO clear your background out and keep things simple.
- DON'T include things that distract from your subject.
- DO zoom in or crop your photo to minimize distracting elements.
Tip #3: Learn your camera settings
Shooting on "auto" probably isn't the best way to improve your photography. It means your camera decides how to shoot the scene and many times it is wrong. It either pops a flash if you don't want it, it underexposes if you're shooting in a large, white area, or it chooses a slow shutter speed which creates a blurred image. Learning the basics of all your settings is a great place to start and I promise you if I can understand it, then any person in the universe can also.  A great site to get started with reading tips and learning controls is: http://digital-photo...ers-should-know You can also search your camera model online and find the manual to read up on it.
Tip #4: Use a tripod and a fast shutter speed, if possible.
A shutter speed that is fast enough to capture motion without much blur is usually at least 1/125th of a second. With dwarf hamsters, something faster then that works even better such as 1/250th of a second. Again, this is another reason to use manual and not auto controls. Your camera may not choose a fast enough speed for what you need and this is why many photos turn out blurred - that, and not enough light. Using a tripod prevents any extra movement from unsteady hands.

Tip #5: Watch your composition.
With something like hamsters, it's practically impossible to know where they will move for you to plan your composition. Sometimes you can get lucky and have them end up in the right place at the right time, but not often! With practice, you can train yourself to automatically see these things until it becomes second nature.
==========================
1. Consider giving your hamster "space" to look into. Rather then positioning your hamster's face near the edge of the photo, give a little space so the photo doesn't feel cramped.
2. Remember the "rule of thirds". The rule of thirds does not have to be a rule, but it can be a good suggestion at times. Next time, instead of placing your hamster smack in the middle of the photo, try imagining a grid in your head, and place the subject roughly at one of the corresponding points. It can make for a much more interesting photo!
3. Try taking photos from a new angle
4. Capture the details that make your hamster cute.
Tip #6: Don't be afraid to mess up or learn.
With today's digital technology, it allows us to shoot whatever we want, as much as we want, without spending excess money on buying film or getting it developed. It also means you can view your photos instantly, which is an excellent learning tool. Perhaps you shot a few pictures and upon viewing them, you realize your shutter speed is too slow. You can then learn from your mistake, fix the settings, and re-shoot until you are satisfied. Don't be afraid to research or ask questions - for this is how you learn and improve!
Tip #7: HAVE FUN!
This is the most important one of all!
==========================
Bonus Photoshop Tutorial
(fixing white balance)


Bonus DIY Diffuser for SLR flash
(easy and cheap)
Note: These photo examples are very old and low quality, but you will get a general idea of this homemade diffuser and how it works.


I hope you have enjoyed this article and tutorial. Kudos to anyone who managed to read the whole thing! Thank you for being willing to learn and try new things. Best of luck with becoming a better photographer and please don't hesitate to ask questions!

Edited by HoppingHammy, 12 July 2017 - 01:49 AM.